The best Discord settings and tips in 2022

Discord is the best way to talk to friends on the internet. Between voice, text, bots, and streaming, the free program has come a long way from a simple TeamSpeak alternative. I love that I can easily hop into a voice channel with friends for hours, but I don’t love how complicated it can be to adjust Discord’s billion settings until I’m satisfied.
I use Discord every day and still get lost scrolling its many options, but my years on the platform have produced a handful of go-to tweaks that anyone can benefit from. Here are my best tips to get the most out of Discord in 2022.
Turn on Noise Suppression
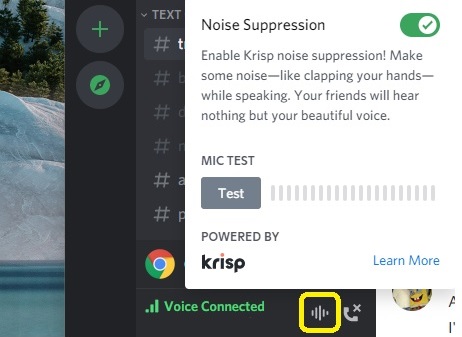
There was a time when it was necessary to fiddle with Discord’s many voice options until friends couldn’t hear my keyboard clacks or the fan blasting in my room, but now I can skip most of this hassle with a single toggle. If you plan to forego push-to-talk and let Discord openly broadcast your mic, you should definitely flip on Noise Suppression. You’ll find a dedicated button for it in the lower-left panel while connected to a voice channel (you can also turn it on in the Voice & Video settings).

(Image credit: Discord)
Noise Suppression is a neat little setting that filters your mic through AI-assisted noise cancellation. Similar to Nvidia Broadcast, Discord’s noise filter doesn’t just cancel out sounds that are below a certain volume. It specifically looks for noises that aren’t your voice, like keyboard clacks, mouse clicks, fans, clapping, etc., and stops them at the door. It works incredibly well in my experience—it’s pretty wild to clap, snap fingers, or bang on my desk and see none of it come through to my friends’ ears. Similar apps can do the job, but the convenience here is not having a third-party program running in the background. I don’t suggest running Noise Suppression and an outside program like Broadcast at the same time. This twice-filtered approach can severely lower the quality of your mic and cut off bits of your sentences.
Just know that the AI isn’t flawless. I’ve seen it randomly stop working or cause weird static for a few moments, but the hiccups are worth it.
Noise Suppression will use extra CPU power while it’s on, but the difference shouldn’t be too noticeable if you have a moderately powerful PC. Discord will actually switch off Noise Suppression automatically to preserve resources when your PC is topping out. You’ll have to remember to switch it back on later if this happens, which is kind of a pain. Noise Suppression also works on Discord mobile now, which means I’ll never have to hear car horns blaring while my friend is walking his dog again.

(Image credit: Discord)Stream any app to friends on PC
Discord’s Go Live button is pretty good at automatically detecting what game you’re playing and setting up a stream with a single click, but it’s not perfect. Sometimes Discord won’t detect the game you’re playing and only shows the option to start an audio-less screen share. There’s an easy way around this that essentially lets you tell Discord to stream any game (or non-game) running on your PC. This one setting is so flexible that it’s basically the not-so-secret key to unlock what Discord Go Live is truly capable of.
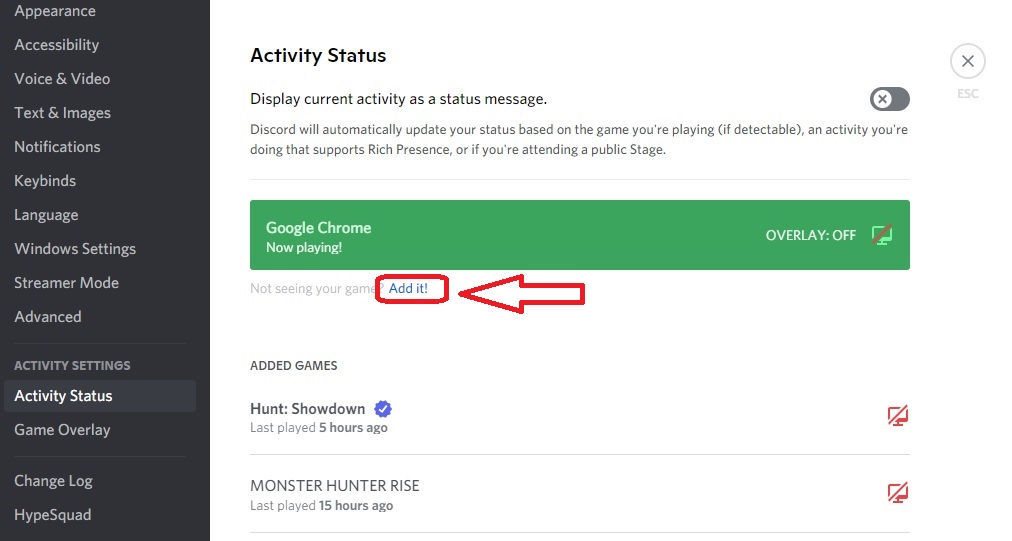
Head over to settings and scroll all the way down to Activity Status. The green box up top displays what app Discord can see you running at the moment, with an option to turn on its overlay for that app (I usually keep it off because it can cause performance issues with some games). To add a game or app that Discord doesn’t already detect, click the little text below the box that says “Add it.” This will bring up a dropdown menu of every program currently running. Select which you’d like to add and you’re set.
I mostly use this feature to add old or new games Discord hasn’t added to its database, but the one non-game program I stream the most is Google Chrome. Firing up a stream is handy for quickly sharing weird internet finds and especially great for synchronized YouTube watching.
Add a music bot to your server
Discord has a huge library of bots that can do all sorts of niche things like roll dice for a D&D campaign or post news on certain topics, but the one bot that almost any server can benefit from is a music bot. Music bots appear like normal members of a Discord server and can be summoned with simple text commands to stream ad-free music based on what you search (usually from YouTube, but other sites are supported). They’re a nice way to play music in sync with every user in a channel at once, and the closest thing to an internet jukebox.
In the case of most bots, adding them to a server is as easy as clicking an “add” button on a website and allowing access to the bot when a popup appears on Discord. Music bots are so convenient that Google took notice in 2021 and shut down two popular music bots for breaking YouTube’s terms of service. There are a few working music bots still out there (my server uses Vexera), but they may be a dying breed, so enjoy them while you can.
Other cool bots to try
- Haikubot: Looks for 5/7/5 patterns in text channel messages and creates haikus for your friends to chuckle at.
- Carl-bot: Ideal for servers big enough to require some organization, this bot can automate the role assignment process as well as 100 other things.
- Remoji: A neat little bot that can quickly upload new custom emotes to your server of choice.

(Image credit: Discord)Turn off annoying notifications
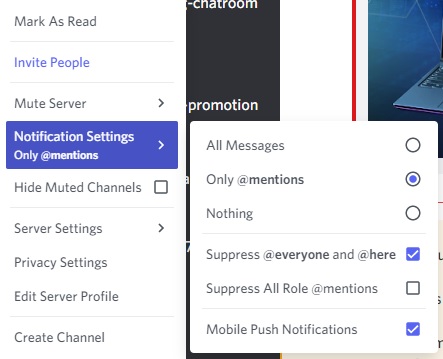
If you’re like me and have found yourself in over a dozen Discord servers that you don’t check very often, then you owe it to yourself to mute all of those annoying notification beeps. Right-click any server on the left sidebar and hover over Notifications Settings to see a bundle of mute options.
I used to set servers so only mentions at me will send me a notification, but Discord recently added new mute options that will also squelch “@here” and “@everyone” and I highly recommend using them.

(Image credit: Discord)Set a few custom keybinds
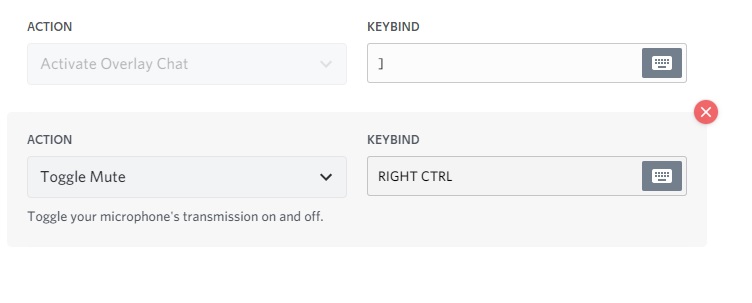
Assigning keybinds is a chore I usually avoid unless a game’s controls are bad, but I’m glad I started using them in Discord. The Keybinds menu (found on the main settings list) would be better labeled as “shortcuts you may find useful.” You can assign keys to all sorts of Discord functions like starting a screen share, toggling the overlay, or turning on Streamer mode. If you’re using an open mic, I recommend making a Toggle Mute bind that you can easily reach for when your hardware mute button is out of reach. Mine’s right Ctrl, if you’re curious.

(Image credit: Discord)If voice chat is laggy, try switching server regions
As nice a service as Discord usually is for voice chat, it can occasionally get a bit laggy. If everyone is experiencing voice lag or disconnecting at the same time, switching the voice channel’s server region is often a quick fix. Assuming you have admin access to the server you’re in, right-click a voice channel, select Edit Channel and scroll down to Region Override.
Discord selects regions automatically by default, but you can freely swap to a nearby region to move everyone to a (hopefully) less laggy server until the usual one is fixed. My server uses US West, so when it lags up I switch to the next closest, US Central, for a while.
Consider boosting your server if you stream a lot
If you have a Discord server full of friends who like streaming games for each other, I think a Discord Nitro sub is worth the cost to boost a personal server (especially if you split it). I have the $10/month sub that gives our server two “boosts.” We have random perks like animated stickers and more banner options, but the only thing we care about is 60 fps streaming for all users at 720p. As the Nitro member boosting the server I also get 1080p streaming, but 720p is perfectly fine on our “Level 1” server. You can unlock 1080p for all users at Level 2, but that’s not worth an extra $25 worth of server boosts to me.
It’s a minor thing in the grand scheme, but we stream for dozens of hours every week. I appreciate the smoother video when friends are playing super fast games like Overwatch or Rainbow Six Siege.
A few more tips to consider
- Click your name to copy your Discord ID: Never manually type your full Discord username again.
- Be careful with Hardware Acceleration: If your computer is chugging under the weight of a big game and Discord streaming, consider turning off Hardware Acceleration in Voice & Video settings. The stream might suffer, but it’ll place less stress on your system.
- Sync Dark/Light mode with your PC’s clock: Find this in Appearance settings. Discord will always be dark to me, but it’s nice to brighten things up while the sun is out.
- Turn off Echo Cancellation: If you have a pretty good mic that doesn’t usually pick up echoes from your headphones, you can safely turn this off and possibly improve your voice quality a bit.
- Turn any message into speech: Type “https://www.pcgamer.com/tts” before a message to send it as text-to-speech to anyone currently viewing the text channel. Handy!
- Turn off Automatic Gain Control: This one’s a bit wonky if you’re also running background software that’s processing your voice. Experiment with your gain in Windows settings and, if your friends have no complaints about your volume or clarity, consider keeping it off.
- Edit invite links to avoid weirdos: Before you send some rando a permanent invite link to your server, click the small “Edit invite link” text at the bottom to customize how long the invite is valid. Make it last for a week or 30 minutes, and even make it a one-time invite that boots the user once they disconnect.

